Showing posts with label realtime. Show all posts

August 05, 2020

MyDocs

Mydocs framework is useful for design each and every step to track the entire project workflow in the single place. It is very useful and helpful for the all the developers, testers, mangers and other teams also.

MkDocs is a fastsimple and downright gorgeous static site are generator that's geared towards building project documentation. Documentation source files are written in Markdown, and configured with a single YAML configuration file. Start by reading the introduction below, then check the User Guide for more info.


To integrate the our project, need to follow the instructions in the https://www.mkdocs.org/ 

Screenshot
Reference:

Read more ...

March 19, 2019

How to specify ignore rules and exceptions from these rules for files and folder, that won’t be included in the build context in Docker(.dockerignore)

The .dockerignore file is the tool. It can help you to define the Docker build context you really need. Using this file, you can specify ignore rules and exceptions from these rules for files and folder, that won’t be included in the build context and thus won’t be packed into an archive and uploaded to the Docker server.

The .dockerignore file is similar to gitignore file. It is used by  the git tool. similarly to .gitignore file, it allows you to specify a pattern for files and folders that should be ignored by the Docker client when generating a build context. While .dockerignore file syntax used to describe ignore patterns is similar to .gitignore it’s not the same.
The .dockerignore pattern matching syntax is based on Go filepath.Match() function and includes some additions.
Here is he complete syntax for the .dockerignore:
Pattern:
{ term }
term:
'*' matches any sequence of non-Separator characters
'?' matches any single non-Separator character
'[' [ '^' ] { character-range } ']'
character class (must be non-empty)
c matches character c (c != '*', '?', '\\', '[')
'\\' c matches character c

character-range:
c matches character c (c != '\\', '-', ']')
'\\' c matches character c
lo '-' hi matches character c for lo <= c <= hi

additions:
'**' matches any number of directories (including zero)
'!' lines starting with ! (exclamation mark) can be used to make exceptions to exclusions
'#' lines starting with this character are ignored: use it for comments
________

Note: Using the ! character is pretty tricky. The combination of it and patterns before and after line with the ! character can be used to create more advanced rules.
Examples:
# ignore .git and .cache folders
.git
.cache

# ignore all *.class files in all folders, including build root
**/*.class

# ignore all markdown files (md) beside all README*.md other than README-secret.md
*.md
!README*.md
README-secret.md

Reference:

Read more ...

November 24, 2018

Keypass - Store useful links for user credentials with secure manager

Nowadays, we are forgetting so many things, It will help to remember our office and personal information with the secure manager key pass tool.
It will maintain different URLs, username, password, other details also. It's free software.

To download link:
https://keepass.info/download.html

we have to create new database with password(automatically encrypt)

we will create a different type of categories like internet, network, email, banking, others etc.


Read more ...

Lightfish- Java application performance tool using glashfish


LightFish is an opensource Java EE 7 application which gathers and persists periodically GlassFish's monitoring data. The probes (snapshots) are gathered via REST, persisted into a relational DB and pushed to Java FX 2 UI in real time via HTTP.

Features / Monitoring:
Threads And Memory:
Heap Size, Thread Count, Peak Thread Count
Transactions:
Commits and Rollbacks
"Paranormal Activity" :-)
Queued Connections, Errors and Busy Thread Count
HTTP Sessions
Active and Expired Sessions
JDBC Pools
Free and used connections, potential connection leaks, and the Length of the wait queue

Download:
http://lightfish.adam-bien.com/

Installation:
Download the lightfish.war from [https://github.com/AdamBien/lightfish/releases](https://github.com/AdamBien/lightfish/releases)

or

0. Setup JAVA_HOME to point to JDK 1.7 installation (lightfish uses JDK 1.7 features)
1. `git clone https://github.com/AdamBien/lightfish.git`
2. Perform `mvn clean install`in the multi-light folder

Download and start GlassFish [asadmin start-database, asadmin start-domain]
Drop the lightfish/target/lightfish.war into /glassfish4.0.X/glassfish/domains/domain1/autodeploy

Point your browser to: http://localhost:8080/lightfish
Click on the "LightView" link to install the LightView client

LightFish should install the necessary connection pool and datasources on-the-fly. There is no setup needed. Tested with GlassFish v4.0.1


Sources: git://github.com/AdamBien/lightfish.git


Need to configure the application url and test live data with graphs

References:
https://www.youtube.com/watch?v=-D7VOyNE-R8
https://www.youtube.com/watch?v=9nU6Oubx0tQ

Read more ...

November 23, 2018

How to resolve eclipse startup exit code 13 and 1 issues


This may occur, the latest jdk installations changes or dependency project changes also.

We can able to resolve this issue, give the appropriate jdk javaw.exe path in the eclipse.ini file

Ex:
....
--launcher.defaultAction
openFile
-vm
C:\Program Files\Java\jdk1.8.0_152\bin\javaw.exe
-vmargs


References:
https://www.youtube.com/watch?v=JJ1jr9o2gjA
https://stackoverflow.com/questions/11461607/cant-start-eclipse-java-was-started-but-returned-exit-code-13
Read more ...

How to integrate jenkins in local environment


Jenkins is an open source automation server written in Java. Jenkins helps to automate the non-human part of the software development process, with continuous integration and facilitating technical aspects of continuous delivery.
Initial release: 2 February 2011.
Repository: https://github.com/jenkinsci/jenkins

To download:
https://jenkins.io/download/
===
Setup proxy if any:
Jenkins - Manager Jenkins - Manage Plugins
http://localhost:8080/pluginManager/advanced

testurl: http://www.googe.com
===
Setting the mavan and jdk instalations:
Jenkins - Manager Jenkins - Global Tool Configurations
http://localhost:8080/configureTools/

Global Maven_OPTS
–Xmx512m
–XX:MaxPermSize=128m
===
Create new item: give your project name: test
and select freestyle project

http://localhost:8080/job/test/configure
Build -
select top-level maven targets
Maven version: maven(selected added plugin)
Golas: clean install -Dbuild.number=${BUILD.NUMBER} ex: add if any additional properties

Go to Advanced:
add pom file path: project path
save
===
Add the pom file below configurations:
<properties>
<project.build.sourceEncoding>UTF-8</project.build.sourceEncoding>
<project.reporting.outputEncoding>UTF-8</project.reporting.outputEncoding>
<java.version>1.8</java.version>
<spring-cloud.version>Edgware.RELEASE</spring-cloud.version>
<build.manifest.section>Build Details</build.manifest.section>
<build.number>UNKNOWN</build.number>
<jenkins.build.number>${build.number}</jenkins.build.number>
</properties>
....

<build>
<plugins>
<plugin>
<groupId>org.apache.maven.plugins</groupId>
<artifactId>maven-jar-plugin</artifactId>
<configuration>
<archive>                  
<manifestEntries>
<Build-Time>${maven.build.timestamp}</Build-Time>  
</manifestEntries>
<manifestSections>
<manifestSection>
<name>${build.manifest.section}</name>
<manifestEntries>
<Implementation-Version>${project.version}</Implementation-Version>
<Implementation-Build-Number>${build.number}</Implementation-Build-Number>
</manifestEntries>
</manifestSection>
</manifestSections>
</archive>
</configuration>
</plugin>
<plugin>
<groupId>org.springframework.boot</groupId>
<artifactId>spring-boot-maven-plugin</artifactId>
<configuration>
<includeSystemScope>true</includeSystemScope>
</configuration>
<executions>
<execution>
<goals>
<goal>build-info</goal>
</goals>
<configuration>
<additionalProperties>
<name>${build.manifest.section}</name>
<Implementation-Version>${project.version}</Implementation-Version>
<Implementation-Build-Number>${jenkins.build.number}</Implementation-Build-Number>
</additionalProperties>
</configuration>
</execution>
</executions>
</plugin>
</plugins>
</build>
Jenkins properties:
http://localhost:8080/env-vars.html/

The following variables are available to shell scripts
BUILD_NUMBER
The current build number, such as "153"
BUILD_ID
The current build ID, identical to BUILD_NUMBER for builds created in 1.597+, but a YYYY-MM-DD_hh-mm-ss timestamp for older builds
BUILD_DISPLAY_NAME
The display name of the current build, which is something like "#153" by default.
JOB_NAME
Name of the project of this build, such as "foo" or "foo/bar".
JOB_BASE_NAME
Short Name of the project of this build stripping off folder paths, such as "foo" for "bar/foo".
BUILD_TAG
String of "jenkins-${JOB_NAME}-${BUILD_NUMBER}". All forward slashes ("/") in the JOB_NAME are replaced with dashes ("-"). Convenient to put into a resource file, a jar file, etc for easier identification.
EXECUTOR_NUMBER
The unique number that identifies the current executor (among executors of the same machine) that’s carrying out this build. This is the number you see in the "build executor status", except that the number starts from 0, not 1.
NODE_NAME
Name of the agent if the build is on an agent, or "master" if run on master
NODE_LABELS
Whitespace-separated list of labels that the node is assigned.
WORKSPACE
The absolute path of the directory assigned to the build as a workspace.
JENKINS_HOME
The absolute path of the directory assigned on the master node for Jenkins to store data.
JENKINS_URL
Full URL of Jenkins, like http://server:port/jenkins/ (note: only available if Jenkins URL set in system configuration)
BUILD_URL
Full URL of this build, like http://server:port/jenkins/job/foo/15/ (Jenkins URL must be set)
JOB_URL
Full URL of this job, like http://server:port/jenkins/job/foo/ (Jenkins URL must be set)


References:
http://www.tothenew.com/blog/how-to-setup-jenkins-for-a-maven-project/
https://en.wikipedia.org/wiki/Jenkins_(software)
https://tedvinke.wordpress.com/2013/04/20/using-jenkins-build-version-with-maven/
http://akeffalas.github.io/blog/2014/04/jenkins-build-info-maven-artifacts.html
https://www.baeldung.com/spring-boot-info-actuator-custom
https://www.vojtechruzicka.com/spring-boot-version/

Read more ...

How to encrypt values in application properties in spring boot application (using Jasypt)

Jasypt (Java Simplified Encryption) Spring Boot provides utilities for encrypting property sources in Boot applications. In this article, we’ll discuss how we can add jasypt-spring-boot‘s support and use it. For more information on using Jasypt as a framework for encryption, take a look at our Introduction to Jasypt here.

Why Jasypt?
Whenever we need to store sensitive information in the configuration file – that means we’re essentially making that information vulnerable; this includes any kind of sensitive information, such as credentials, but certainly a lot more than that.
By using Jasypt, we can provide encryption for the property file attributes and our application will do the job of decrypting it and retrieving the original value.
Unfortunately we can't use user personal values plain text in application.properties file.
Jasypt (Java Simplified Encryption) is a java library which allows the developer to add basic encryption capabilities to his/her projects with minimum effort, and without the need of having deep knowledge on how cryptography works.

First, add the related dependency to the project. I am using maven so I will add the maven dependency to my pom.xml
https://mvnrepository.com/artifact/com.github.ulisesbocchio/jasypt-spring-boot-starter

    com.github.ulisesbocchio
    jasypt-spring-boot-starter
    2.0.0

In the application.properties (or yaml), we will write our encrypted properties between parenthesis and put ENC keyword before it. Like;
MyProperty=ENC(23ClLWiedLx8v6XT6Wk+Bg==)

How to generate those encrpyted values? We will use Jasypt for that! Go to http://www.jasypt.org/ and download the latest version. When you are done, go into jasypt\bin and use the encrypt.sh or encrypt.bat to encrypt your variables. There are several algorithms to pick but I will leave it as default and only give my property value and secret to encrpyt it.

We only need to add @EnableConfigurationProperties annotation to our application and jasypt will automaticly detect encrypted values and decrypt them before they are being used. The CommandLineRunner I have added below is just to test the decryption mechanism.

@EnableEncryptableProperties
@SpringBootApplication
public class JasyptExampleApplication {

  public static void main(String[] args) {
    SpringApplication.run(JasyptExampleApplication.class, args);
  }
 
  @Component
  public class MyRunner implements CommandLineRunner {
   
    @Value("${myProperty}")
    private String myProperty;

    @Override
    public void run(String... args) throws Exception {
      System.out.println("My property is = " + myProperty);
    }
   
  }
}

But if you run your code like this, you will get the below error:
Error creating bean with name 'demo.JasyptExampleApplication$MyRunner': Injection of autowired dependencies failed; nested exception is java.lang.IllegalStateException: Required Encryption configuration property missing: jasypt.encryptor.password
This is because Jasypt needs to know the secret(password) to decrypt the property. We can tell this to our program several ways:
1- We can give it as a command line argument when running the application;
–jasypt.encryptor.password=MY_SECRET
2- We can set it as an environment variable, this is also useful when you are running your application on Tomcat. You can give it to Tomcat’s setenv.sh file;
export CATALINA_OPTS=”-Djasypt.encryptor.password=MY_SECRET”
You can also unset the environment variable after running the application, so there will be no doorway left behind, at least in a human-readable sense.
3- You can give it in application.properties but this might be the dumbest way as it has no difference with giving the property as plain text.
If you know a better way, write a comment below!


2018-04-25 14:03:26.948 INFO 10028 --- [ main] demo.JasyptExampleApplication : Started JasyptExampleApplication in 1.264 seconds (JVM running for 2.06)
My property is MBcoder


As you can see it picked up the PBEWithMD5AndDES algorithm as default value and with the given password, MY_SECRET, it successfully decrypted myProperty
I hope this article was useful, see you another time!

Reference:
https://www.baeldung.com/spring-boot-jasypt
http://mbcoder.com/spring-boot-how-to-encrypt-properties-in-application-properties/
Read more ...

November 09, 2018

Free mockups or project wireframes for realtime projects

Wireframe: a skeletal three-dimensional model in which only lines and vertices are represented.

Balsamiq Mockups 3 is the result of nearly a year of heads-down coding to create the product that our customers have been asking for and the product we wanted for ourselves.

The most noticeable changes are the two “biggies” that people have asked for since the very beginning: Support for projects (bundled files, multiple windows) and getting rid of that “floating property thingy” (the property inspector).

But just as important was the work that was done under the hood to make it faster and smarter and the little tweaks across every part of the experience that we hope will make using it even better.

Balsamiq Mockups 3 features:
In a word, lots! Here are the “highlights” you should know about:
Projects!
A new user interface
Easier look and feel customization
Better Symbols
Better icons
Better images and assets
Full screen mode
Notes
Trash
Alternates
Music

New releases:
https://www.youtube.com/watch?time_continue=315&v=-Zz8EYPhEew
https://www.youtube.com/watch?v=KnZrypOaVCg

Refereces:
https://docs.balsamiq.com/desktop/intro/
https://balsamiq.com/download/
Read more ...

November 08, 2018

Fail to initialize due to unknown Zone Id while running springboot application


Fail to initialize due to unknown Zone Id while running springboot application:

> Errors while running application:

- Application startup failed java.time.zone.ZoneRulesException: Unknown time-zone ID: America/Fort_Nelson

- Caused by: java.time.zone.ZoneRulesException: Unknown time-zone ID: America/Fort_Nelson
at java.time.zone.ZoneRulesProvider.getProvider(ZoneRulesProvider.java:272)
at java.time.zone.ZoneRulesProvider.getRules(ZoneRulesProvider.java:227)
at java.time.ZoneRegion.ofId(ZoneRegion.java:120)


> For using the latest version of Timeshape, the 2018d.3 or 2018d.4: We are facing this issue,


net.iakovlev
timeshape
2018d.5


> After so much analysis, released 2018d.5 where this change is merged and working fine with out any issues.

For applicaiton instalization:

@Component
public class AppStartUpConfig implements ApplicationListener {
@Autowired
TimeZone timeZone;
@Override
public void onApplicationEvent(ApplicationReadyEvent arg0) {
timeZone.setTimeZoneEngine(TimeZoneEngine.initialize());
}
}

In dto:
@GeoSpatialIndexed
private Point geoCoordinates;

For actual usage class:
@Autowired
TimeZone timeZoneEngine;

To get the geoCoordinates:
Optional zoneId = timeZoneEngine.getTimeZoneEngine().query(
geoCoordinates.getY(),
geoCoordinates.getX());
String timezoneId = zoneId.get().getId();


Reference:
https://github.com/RomanIakovlev/timeshape/issues/12

Read more ...

October 01, 2018

Solution for upload Large File in a Spring Boot


Default browser/postman allows 1MB files for uploading, if want to upload more then 1MB, we need to do below configurations based spring-boot versions

Exception while uploading file/image:
org.springframework.web.multipart.MultipartException: Could not parse multipart servlet request; nested exception is java.lang.IllegalStateException: org.apache.tomcat.util.http.fileupload.FileUploadBase$SizeLimitExceededException: the request was rejected because its size (1025607423) exceeds the configured maximum (104857600)

Solution for spring-boot 1.5.12:
For org.springframework.boot spring-boot-starter-parent 1.5.12.RELEASE;
application.yml
===
spring:
  http:
    multipart:
      max-file-size: 100MB
      max-request-size: 100MB

===   
Reference:
https://javadeveloperzone.com/common-error/org-apache-tomcat-util-http-fileupload-fileuploadbasefilesizelimitexceededexception-field-file-exceeds-maximum-permitted-size-n-bytes/
https://dzone.com/articles/upload-large-file-in-spring-boot-2-application-usi
https://stackoverflow.com/questions/34177873/max-limit-of-multipartfile-in-spring-boot
https://grokonez.com/java-integration/upload-multipartfile-spring-boot
Read more ...

August 10, 2018

Given strings are Anagram or not?

Write a function to check whether two given strings are anagram of each other or not. An anagram of a string is another string that contains same characters, only the order of characters can be different. For example, “abcd” and “dabc” are anagram of each other.
check-whether-two-strings-are-anagram-of-each-otherWe strongly recommend that you click here and practice it, before moving on to the solution.


Program:
public class Anagram {
public static void main(String[] args) {
String input1 = "d1asu";
String input2 = "adsu";
System.out.println("Given string are input1: " + input1 + ", input2: " + input2);
System.out.println("" + isAnagram(input1, input2));
}
private static String isAnagram(String input1, String input2) {
String result = "Given strings are not anagram";
boolean isAnagram = false;
if (!input1.isEmpty() && !input2.isEmpty() && (input1.length() == input2.length())) {
char[] arr = input1.toCharArray();
StringBuilder sb = new StringBuilder(input2);
for (char a : arr) {
int index = sb.indexOf("" + a);
if (index != -1) {
sb.deleteCharAt(sb.indexOf("" + a));
}
}
isAnagram = sb.toString().isEmpty();
}
if (!isAnagram) {
return result;
}
return "Given strings is anagram";
}
}
Output:
Given string are input1: d1asu, input2: adsu
Given strings are not anagram
Reference:
https://www.devglan.com/java-programs/anagram-test
https://www.geeksforgeeks.org/check-whether-two-strings-are-anagram-of-each-other/


Read more ...

Given String is Pangram or not?


Given a string check if it is Pangram or not. A pangram is a sentence containing every letter in the English Alphabet.
Examples : The quick brown fox jumps over the lazy dog ” is a Pangram [Contains all the characters from ‘a’ to ‘z’]
“The quick brown fox jumps over the dog” is not a Pangram [Doesn’t contains all the characters from ‘a’ to ‘z’, as ‘l’, ‘z’, ‘y’ are missing]
Recommended: Please solve it on “PRACTICE ” first, before moving on to the solution.
We create a mark[] array of Boolean type. We iterate through all the characters of our string and whenever we see a character we mark it. Lowercase and Uppercase are considered the same. So ‘A’ and ‘a’ are marked in index 0 and similarly ‘Z’ and ‘z’ are marked in index 25.
After iterating through all the characters we check whether all the characters are marked or not. If not then return false as this is not a pangram else return true.

Program:

public class Panagram {


public static void main(String[] args) {
String input = "The quick brown fox jumps over the lazy dog";
System.out.println("Panagram test string : "+input);

System.out.println(""+ checkPanagram(input));
}

/**
*Returns true if the string     is pangram else false
* @param input
* @return
*/
private static String checkPanagram(String input) {
String result = "Given string is not panagram";
  // Create a hash table to mark the
        // characters present in the string
        // By default all the elements of
        // mark would be false.
boolean[] mark = new boolean[26];

if(input == null) {
return "Given input is invalid";
}
// For indexing in mark[]
int index = 0;
// Traverse all characters
for(int i=0;i // If uppercase character, subtract 'A'
            // to find index.
if( 'A' <= input.charAt(i) && input.charAt(i)  <= 'Z') {
index = input.charAt(i) - 'A';
System.out.println("current value: "+input.charAt(i)+", index :"+index);
}
// If lowercase character, subtract 'a'
            // to find index.
if( 'a' <= input.charAt(i) && input.charAt(i)  <= 'z') {
index = input.charAt(i) - 'a';
System.out.println("current value: "+input.charAt(i)+", index :"+index);
}
// Mark current character
mark[index] = true;

}
System.out.println("mark: "+mark+", length: "+mark.length);
// Return false if any character is unmarked
for(int j =0;j if(mark[j] == false) {
return result;
}
}
// If all characters were present
return "The Given String is panagram.";
}

}


Output:
Panagram test string : The quick brown fox jumps over the lazy dog
current value: T, index :19
current value: h, index :7
current value: e, index :4
current value: q, index :16
current value: u, index :20
current value: i, index :8
current value: c, index :2
current value: k, index :10
current value: b, index :1
current value: r, index :17
current value: o, index :14
current value: w, index :22
current value: n, index :13
current value: f, index :5
current value: o, index :14
current value: x, index :23
current value: j, index :9
current value: u, index :20
current value: m, index :12
current value: p, index :15
current value: s, index :18
current value: o, index :14
current value: v, index :21
current value: e, index :4
current value: r, index :17
current value: t, index :19
current value: h, index :7
current value: e, index :4
current value: l, index :11
current value: a, index :0
current value: z, index :25
current value: y, index :24
current value: d, index :3
current value: o, index :14
current value: g, index :6
mark: [Z@70dea4e, length: 26
The Given String is panagram.


References:
https://www.geeksforgeeks.org/pangram-checking/

Read more ...

July 24, 2018

Differences between stub and mock

Mocks and stubs are both dummy implementations of objects the code under test interacts with. The same object may be replaced with a stub in one test and a mock in another depending on the intent of the test.

Stubs can be thought of as inputs to the code under test. When called they behave a certain way – return a fixed value, throw an exception, calculate a return value based on parameters, pull from a sequence of values, etc. You'd use a stub to simulate the collaborator behavior that drives the behavior of the code under test. For example, if your code queries a database using a DAO you might supply a stub DAO and have tests that verify the behavior when your code finds one result, multiple results, zero results or when the query fails with an exception. Stubs provide the condition that prompts the different behavior in your code but they're not the way you verify that behavior.

Mocks can be thought of as outputs from the code under test. Under certain circumstances your code should or should not interact with a collaborator or should interact with it in a specific way – pass certain parameters, call multiple times, call methods in a certain order, etc. The simplest example is an asynchronous method that accepts a callback parameter. With a synchronous methodthat just returned a value, you'd simply check that return value. With an asynchronous version, you can pass a mock callback and verify the value passed to it.


Fake
Fakes are objects that have working implementations, but not same as production one. Usually they take some shortcut and have simplified version of production code.
An example of this shortcut can be an in-memory implementation of Data Access Object or Repository. This fake implementation will not engage database but will use a simple collection to store data. This allows us to do integration test of services without starting up a database and performing time-consuming requests.

Stub
Stub is an object that holds predefined data and uses it to answer calls during tests. It is used when we cannot or don’t want to involve objects that would answer with real data or have undesirable side effects.
An example can be an object that needs to grab some data from he database to respond to a method call. Instead of the real object, we introduced a stub and defined what data should be returned.

Mock
Mocks are objects that register calls they receive. In test assertion, we can verify on Mocks that all expected actions were performed.
We use mocks when we don’t want to invoke production code or when there is no easy way to verify, that intended code was executed. There is no return value and no easy way to check system state change.


References:
https://www.quora.com/Software-Testing-What-is-the-difference-between-Mocks-and-Stubs
https://blog.pragmatists.com/test-doubles-fakes-mocks-and-stubs-1a7491dfa3da
Read more ...

July 23, 2018

JAVA9: JSHELL (jshell) tool will be a command-line tool

In this article we will discuss about jshell(Java Shell) Java 9 feature. We can explore jShell with JDK 9 Early Access Release.  As of now the general availability of JDK9 is scheduled to 27th July, 2017. The jShell feature is proposed as part of JEP 222. The motivation behind jshell is to provide interactive command line tools to explore the features of java quickly. It is very useful tool to get the glimpse of Java features very quickly for the new learners. Already Java is incorporating functional programming features from Scala. In the same direction they want REPL(Read-Eval-Print Loop) interactive shell for Java as Scala, Ruby, JavaScript, Haskell, Clojure, and Python.

                       The jshell tool will be a command-line tool with features like, a history of statements with editing, tab completion, automatic addition of needed terminal semicolons, and configurable predefined imports.
After downloading the JDK 9, set the PATH variable to access jshell. Now, we will see how to use jshell. Below is the simple program using jshell. We no need to write a class with public static void main(String[] args) method to run simple hello world application.
C:\Users\ABC>jshell
|  Welcome to JShell -- Version 9-ea
|  For an introduction type: /help intro

jshell> System.out.println("Sayo to jshell!!!");
Say hello to jshell!!!

jshell>
Now we will write method which will add two variables and invoke method via jshell.
jshell> public class Sample {
   ...> public int add(int a, int b) {
   ...> return a+b;
   ...> }
   ...> }
|  created class Sample
jshell> Sample s = new Sample();
s ==> Sample@49993335

jshell> s.add(10,9);
$4 ==> 19
jshell>
Now, we will create a static method with StringBuilder class without importing it, as jshell does that for you.
jshell> public class Sample {
   ...> public static void join() {
   ...> StringBuilder sb = new StringBuilder();
   ...> sb.append("Smart").append(" ").append("Techie");
   ...> System.out.println("Theng is " + sb.toString());
   ...> }
   ...> }
|  created class Sample

jshell> Sample.join();
The string is Smart Techie

jshell>


Read more ...

March 28, 2018

Upload a file in cloud space(multipart upload operation) using HttpClient

To use below program, to upload a file easily in could space.
we will illustrate how to do a multipart upload operation using HttpClient.


import java.io.BufferedReader;
import java.io.File;
import java.io.FileOutputStream;
import java.io.IOException;
import java.io.InputStreamReader;
import java.io.StringReader;
import java.io.StringWriter;
import java.util.LinkedHashMap;

import javax.xml.parsers.DocumentBuilder;
import javax.xml.parsers.DocumentBuilderFactory;
import javax.xml.transform.OutputKeys;
import javax.xml.transform.Transformer;
import javax.xml.transform.TransformerFactory;
import javax.xml.transform.dom.DOMSource;
import javax.xml.transform.stream.StreamResult;

import org.apache.http.HttpEntity;
import org.apache.http.HttpResponse;
import org.apache.http.client.ClientProtocolException;
import org.apache.http.client.methods.HttpPost;
import org.apache.http.entity.ContentType;
import org.apache.http.entity.mime.HttpMultipartMode;
import org.apache.http.entity.mime.MultipartEntityBuilder;
import org.apache.http.impl.client.CloseableHttpClient;
import org.apache.http.impl.client.HttpClients;
import org.apache.tomcat.util.http.fileupload.FileItem;
import org.apache.tomcat.util.http.fileupload.disk.DiskFileItem;
import org.springframework.web.multipart.MultipartFile;
import org.w3c.dom.Document;
import org.xml.sax.InputSource;

/**
* This class is used for uploading image in cloud
*/
public class UploadImage {

public static void main(String[] args) throws IOException {
httpImageTest();
//convertFileFromMultipartFile - convert multipart file to file object

     }

    private static void httpImageTest() throws ClientProtocolException, IOException {
        File file = new File(""); //c:/image/test.jpeg
        CloseableHttpClient client = HttpClients.createDefault();
        HttpPost post = new HttpPost("");
        post.addHeader("", "");
        MultipartEntityBuilder builder = MultipartEntityBuilder.create();
        builder.setMode(HttpMultipartMode.BROWSER_COMPATIBLE);
        builder.addTextBody("Content-Type", "image/jpeg");
        builder.addBinaryBody("file", file, ContentType.DEFAULT_BINARY, "fileName.jpeg");

        HttpEntity entity = builder.build();
        post.setEntity(entity);
        HttpResponse response = client.execute(post);
        System.out.println(response.getStatusLine());
        BufferedReader rd = new BufferedReader(new InputStreamReader(response.getEntity().getContent()));
        StringBuffer result = new StringBuffer();
        String line = "";
        while ((line = rd.readLine()) != null)
            result.append(line);
        System.out.println(formatXML(result.toString()));
        client.close();
    }

private static File convertFileFromMultipartFile(MultipartFile file) throws IOException {
        File convFile = new File(file.getOriginalFilename());
        convFile.createNewFile();
        FileOutputStream fos = new FileOutputStream(convFile);
        fos.write(file.getBytes());
        fos.close();
        return convFile;
    }

    private static String formatXML(String input) {
        try {
            Transformer transformer = TransformerFactory.newInstance().newTransformer();
            transformer.setOutputProperty(OutputKeys.INDENT, "yes");
            transformer.setOutputProperty("{http://xml.apache.org/xslt}indent-amount", "3");

            StreamResult result = new StreamResult(new StringWriter());
            DOMSource source = new DOMSource(parseXml(input));
            transformer.transform(source, result);
            return result.getWriter().toString();
        } catch (Exception e) {
            e.printStackTrace();
            return input;
        }
    }

    private static Document parseXml(String in) {
        try {
            DocumentBuilderFactory dbf = DocumentBuilderFactory.newInstance();
            DocumentBuilder db = dbf.newDocumentBuilder();
            InputSource is = new InputSource(new StringReader(in));
            return db.parse(is);
        } catch (Exception e) {
            throw new RuntimeException(e);
        }
    }
}

Reference: http://www.baeldung.com/httpclient-multipart-upload

Read more ...

December 28, 2017

How to handle "java net unknownhostexception" exception

While creating restTemplate, we have to configure proxy settings like:

@Bean
RestTemplate restTemplate() {
final String username = "xxxxx";
final String password = "XXXXXX";
final String proxyUrl = "XXXX.com";
final int port = 8080;

CredentialsProvider credsProvider = new BasicCredentialsProvider();
credsProvider.setCredentials(
new AuthScope(proxyUrl, port),
new UsernamePasswordCredentials(username, password));
HttpHost myProxy = new HttpHost(proxyUrl, port);
HttpClientBuilder clientBuilder = HttpClientBuilder.create();
clientBuilder.setProxy(myProxy).setDefaultCredentialsProvider(credsProvider).disableCookieManagement();
HttpClient httpClient = clientBuilder.build();
HttpComponentsClientHttpRequestFactory factory = new HttpComponentsClientHttpRequestFactory();
factory.setHttpClient(httpClient);      
return new RestTemplate(factory);
}
Driver program:
String getUrl = "https://XXXX/XXXX";//ex: "http://localhost:8080/get?id=1&name='Dasu'&age=30";
ResponseEntity getResponse = restTemplate().getForEntity(getUrl, Object.class);
if (getResponse.getBody() != null) {
System.out.println("Response for Get Request: " + getResponse.getBody().toString());
} else {
System.out.println("Response for Get Request: NULL");
}
Read more ...

December 08, 2017

SOAP vs REST Web Services

No.SOAPREST
1)SOAP is a protocol.REST is an architectural style.
2)SOAP stands for Simple Object Access Protocol.REST stands for REpresentational State Transfer.
3)SOAP can't use REST because it is a protocol.REST can use SOAP web services because it is a concept and can use any protocol like HTTP, SOAP.
4)SOAP uses services interfaces to expose the business logic.REST uses URI to expose business logic.
5)JAX-WS is the Java API for SOAP web services.JAX-RS is the Java API for RESTful web services.
6)SOAP defines standards to be strictly followed.REST does not define too many standards like SOAP.
7)SOAP requires more bandwidth and resource than REST.REST requires less bandwidth and resource than SOAP.
8)SOAP defines its own security.RESTful web services inherit security measures from the underlying transport.
9)SOAP permits XML data format only.REST permits different data format such as Plain text, HTML, XML, JSON etc.
10)SOAP is less preferred than REST.REST more preferred than SOAP.


Reference: https://www.javatpoint.com/soap-vs-rest-web-services
Read more ...

Difference between Object Oriented Programming(OOP) vs. Functional Programming(FP)

Object-oriented programming (OOP) is a programming paradigm based on the concept of "objects", which are data structures that contain data, in the form of fields, often known as attributes; and code, in the form of procedures, often known as methods -- Wikipedia https://en.wikipedia.org/wiki/Object-oriented_programming
Functional programming is a programming paradigm, a style of building the structure and elements of computer programs, that treats computation as the evaluation of mathematical functions and avoids changing-state and mutable data -- Wikipedia https://en.wikipedia.org/wiki/Functional_programming

These are acceptable descriptions if you already understand the concepts they’re describing, but not helpful if you don’t. Let’s see if we can do better.
Both OOP and FP have the shared goal of creating understandable, flexible programs that are free of bugs. But they have two different approaches for how to best create those programs.
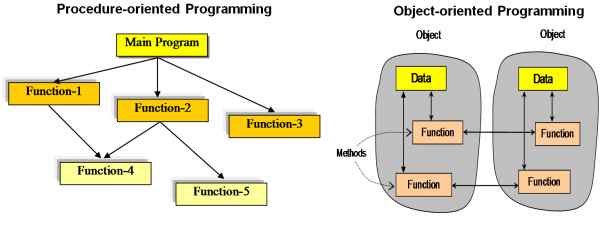
In all programs, there are two primary components: the data (the stuff a program knows) and the behaviours (the stuff a program can do to/with that data). OOP says that bringing together data and its associated behaviour in a single location (called an “object”) makes it easier to understand how a program works. FP says that data and behaviour are distinctively different things and should be kept separate for clarity.
Let’s look at some examples of the two approaches. I’m using Ruby because it natively supports both styles and is easy to read for non-rubyists, but other languages also support both, such as JavaScript and Scala.
Let’s say you run a company and you’ve just decided to give all your employees a $10,000.00 raise. (If this sort of thing happens often at your company, let me know when you’re hiring) How could we write a command-line script to make this change?
You most likely have all your employee records in a database with two attributes: the employee’s name and a current salary. In our examples, we’ll ignore the part where you transfer the data to and from the database. Let’s just focus on the “giving a raise” feature.
Here’s one approach using OOP:
class Employee
  def initialize(name, salary)
    @name = name
    @salary = salary
  end

  def change_salary(amt)
    @salary = @salary + amt
  end

  def description
    "#{@name} makes #{@salary}"
  end
end
This is our class, which we’ll use to generate new Employee objects. Most OOP languages use classes to generate objects in the same way a cook uses recipes to create meals -- the classes tell us how to construct the object, how it should behave, what it looks like, etc.
The @-sign before a variable makes it an “instance” variable: a variable that lives inside the object (aka instance) and can be used in its methods without having been passed in as an argument, the way change_salary uses @salary. The initialize method takes the name and salary we passed to new and stores them in the @name and @salary instance variables.
All the methods except for initializing are “instance methods” which also live inside the object (aka instance) and can be called on the object itself.
Now we’ll generate some objects to work with.
employees = [
  Employee.new("Bob", 100000.0),
  Employee.new("Jane", 125000.0)
]
Each Employee.new(...) call creates an object with data (@name and @salary) and behavior (change_salary and description). We call new twice, which gives us a pair of objects representing Bob and Jane stored in an array we are calling “employees”. In a normal app, this array of objects will typically be returned from the database directly by a tool such as ActiveRecord.
Now let’s give out those raises.
employees.each do |emp|
  emp.change_salary(10000.0)
end
We call each method on our array of employees, which hands us each employee in turn and stores it in a local variable called emp. We call the “change_salary” method we defined in our class, passing in a value of 10000.0. This adds our $10K to the employee’s salary and stores the sum in @salary, overwriting the existing value.
employees.each do |emp|
  puts emp.description
end
Finally, we can generate some output to make sure the results are what we intended, using the described method to build our output string instead of trying to access the data fields (@salary and @name) directly. This is called “data hiding” and it allows us to change the names of our instance variables without forcing the users of our object to change how they use it.
We use each again to output the results. This time, we use puts (put string) and call the description method for each of our objects to print their description, as we defined in our class.
There are several important things to notice about the OOP implementation. Data is supplied to an object at the time the object is created (when we called the ‘new’ method). Then we use methods on that object (change_salary and description) to interact with data that we’ve already stored. This gives us a good place to put all the behaviours that are associated with that object type, making them easy to find if we’re unfamiliar with the codebase or refreshing our memory after some time away. The names of these methods document object’s behaviours , which also helps us familiarize ourselves with the code. The object is an obvious location to add behaviours as our project becomes more complex.
Let’s implement this task using an FP approach.
employees = [
  [ "Bob",  100000.0 ],
  [ "Jane", 125000.0 ]
]
This time our data structure is an array of arrays instead of an array of objects containing the values. FP prefers to keep data in plain arrays and/or hashes and not “complicate” data by mixing it with behaviour.
Instead of converting the data to an object and then calling methods on it, we write a pair of standalone methods called change_salaries (plural) and change_salary (singular). We pass change_salaries two arguments: the array of arrays representing our data and the change amount. change_salaries uses a map instead of each method we used in the OOP version. We’ll discuss map in a moment.
FP leans very heavily on tiny methods that do one small part of a larger job, delegating the details to other tiny methods. This combining of small methods into a larger task is called “composition”. In our example, change_salaries has a single job: call change_salary for each employee in the employee's array and return those values as a new array. change_salary also has one job: return a copy of a single employee with the salary field updated. change_salaries delegates the calculation of the new salary to change_salary, allowing change_salaries to focus entirely on handling the set of employees and change_salary to focus on updating a single employee. A nice side-effect of this approach is if we had a single employee we wanted to change the salary for, we could call change_salary directly! The composition isn’t unique to FP -- OOP uses it as well -- but it is a cornerstone of the FP mindset.
happier_employees = change_salaries(employees, 10000.0)
Because we don’t have objects, change_salaries requires that we pass in not just the amount, but also the data we want to modify. This method returns the updated dataset, which we store in the happier_employees variable.
happier_employees.each do |emp|
  puts "#{emp[0]} makes #{emp[1]}"
end
Finally, we use ‘each’ to walk through every record in happier_employees and generate the output message ourselves. This fits the FP model because FP likes to view everything as a data transformation: you start with this dataset, apply these transformations to it (in this case, adding $10K) and generate a new dataset.
Something you’ll notice right off is there are fewer lines of code, mainly because we don’t build the class for creating our objects.
Another subtle -- but important -- the difference is that in the OOP version change_salary used each to process each employee, but the FP version uses map. Instead of changing the original value, ’map’ creates a copy of the array containing the return value of each pass. When all elements have been processed, map hands us the copy with all the new values, which we store in happier_employees. The original array is untouched!
This idea of not changing the contents (or “state”) of a variable once it’s been created is called immutability and is another key aspect of FP. In the OOP version, the contents of the employee's array changes over time: before change_salary is applied the salaries are 100K and 125K, but afterwards, they are 110K and 135K! This means we don’t always know which value we’ll have at any given point in the program: we have to walk through the program flow and find out if change_salary has been called or not. This can be difficult as the program increases in complexity. The FP version avoids this because employees represent the “before” state and happier_employees represents the “after” state. Their values are always the same over their entire existence.
So which approach should you choose for your next project?
Michael Fogus, author of “Functional JavaScript”, suggests in his blog post “FP vs OO, from the trenches” (http://blog.fogus.me/2013/07/22/fp-vs-oo-from-the-trenches/) that when he deals with data about people, FP works well, but when he tries to simulate people, OOP works well. Our example is “data about people” -- since we’re changing the salary directly -- so the FP version is shorter and simpler. If we described a feature like “employee requests time off” that requires a more-complicated interaction with the data -- likely creating a “time-off request” object attached to the employee -- then OOP might be a better fit. Hardcore OOP or FP developers could explain why their approach is better in either situation, which makes this debate so interesting. Read the comments on the post for an example of the dialogue that surrounds OOP and FP.
If you’re on a tight schedule and are already familiar with one approach or the other, stick with what you know. If it’s a personal project or you have some flexibility with deadlines, it might be worth trying each approach for a feature and seeing which results in a more pleasing, clear solution. We’ve only scratched the surface, and the problems you’re solving may look nothing like the trivial one I used in my example. Explore both and use your best judgement.
Reference: https://www.codenewbie.org/blogs/object-oriented-programming-vs-functional-programming
Read more ...

My Favorite Site's List

#update below script more than 500 posts